

Batch is not a typed language, every piece of data has the same type, and because of this there are limitations as to how you can manipulate them. There is no built in list type in Batch, and this plugin was created to alleviate that. With my plugin, List, you can manipulate lists containing thousands of values in just seconds or less using one 15kb file.
RELATED VIDEO
THE FUNDAMENTALS
A list is just a series of values, similar to an array. In my Batch implementation of it, a list is stored inside of a file when the operations are done, in order to access elements inside of it. This allows for any plugin to interface with a lists data. You can create as many lists as you want and work with as many of them as you want in your program. The list plugin allows you to do operations on each end of the list (similar to a stack, push and pop on both sides), as well as anywhere in the list (insert). You can get the value of indexes in the list as well as search for a location of a value (if it exists). Most of the commands return the result to stdout so it can be processed later.
INSTALLATION/BASIC SYNTAX
You can download the plugin from my GitHub Page, there you can find additional help for the plugin. Inside of the \bin\ folder you will find a single precompiled executable containing the plugin. Simply add that to your path or distribute it with your application to use the plugin.
The syntax of the plugin is very simple and follows the same pattern in all commands:
List.exe <list file> <command> <arguments ... > [/v]The list file is the file containing the list, or the name of a file to be created. If you are wanting to create a list, you must use the /nl or new command which is described below. If you specify a nonexistent file, the program will error. The command is the operation that is going to be done to the list. The arguments depend on what command is done. At the end of the plugin call, you can specify /v to enable verbose mode, which increases the logging level of some commands.
There are two ways to reference the commands. The first (left of the pipe character) is the batch-style switch method. The second (right of the pipe character) is simply a string name of the command for easier reading. The following is a list of commands available in the plugin as well as their arguments:
/v  | verbose - use as the final argument, extends logging level

/nl | new <filename> - new list, creates a new list with the specified name

/af | push <value> - push an item to the front of the list

/rf | pop - pop an item from the front of the list and return it

/ab | append <value> - append an item to the end of the list

/rb | popback - pop an item from the end of the list and return it

/ra | remove <index> - remove an item by index and return it

/rw | removewhere <value> - remove an item by value, notifies if not found

/gi | get <index> - print the value stored at an index

/gl | print - print the entire list, each item on a newline

/ia | insert <index> <value> - insert an item at an index, the previous item at that index is pushed to to the right/down

/fv | find <value> - find a value and return its index, notifies if not found

/ll | getlength - get the length of the list in number of elements

/il | sizeof <index> - get the length of a value in the list. returns both characters and bytes size in verbose mode
Some commands return data (such as popping a value or getting the size of a index). The plugin will return the data (such as a value or index) to stdout when it is finished. You can capture this data for processing if you want. Like I mentioned before, certain commands will have their output modified to include extra information when verbose mode is enabled. I would not recommend enabling it for most applications, and to use it only in debugging.
DEMONSTRATION – PUSH AND POP
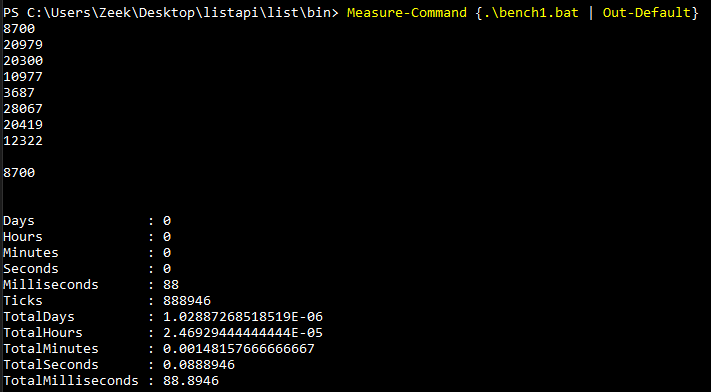
The most basic commands for the list are the push and pop operations. You can do them on either the front or the back of the list. For this demonstration, I will be using the alternate command style for easier readability. This demonstration program will create a list of 8 random integers by pushing them on top of each other and printing out the result with print and get
@echo off
:: Create the list
if exist demo del demo
list demo /nl
:: Push the items, this can be done in a FOR loop for larger sizes
:: Keep in mind that the last push statement is the first item in
:: The list, the push command is similar to a stack.
list demo push %random%
list demo push %random%
list demo push %random%
list demo push %random%
list demo push %random%
list demo push %random%
list demo push %random%
list demo push %random%
:: Display the list either with type or the builtin print function
list demo print
echo.
echo.
:: Display the first (or top) item in the list
list demo get 0 <-- I will explain this in the next section
Since we are using random numbers, each run will have different list sequence. One iteration of the output could look something like this:
17090
31363
29270
14013
9414
17355
8478
4563

17090
Press any key to continue . . .
In the same way, there is also the ability to pop items from the top of the list. The pop command takes no arguments, and returns the popped item to the screen. For example, we can demonstrate this by using the plugin in the command-line directly instead of a batch file.
>list demo /nl <-- Create a new list

>list demo push 10 <-- Push a value to the list

>list demo pop <-- Remove the top value from the list
10 <-- Our result in stdout
It is a serious limitation if these two operations can only be done in the front of the list. This is why I added the append and popback commands. These do exactly as push and pop do, but at the end of the list. You can use this if you do not want to manipulate your list like a stack, and instead add items like a sequence in an array. For the sake of brevity, I will not include an example, as it is exactly like the above.
DEMONSTRATION – ACCESSING OUR LIST
You can access values in your list by using get, print, find, getlength and sizeof. Keep in mind that the list is zero indexed. This means the first item is at index zero. Let’s create a demonstration showing all of these functions:
@echo off
:: Create our list
if exist demo2 del demo2
list demo2 /nl

:: Append our values
list demo2 append 1
list demo2 append "Hello, World!"
list demo2 append 3
pause

:: Get the item at index 0
list demo2 get 0
pause

:: Get the item at index 1, it should be a string. Get it's length in
:: Characters also.
list demo2 get 1
list demo2 sizeof 1
pause

:: Get the length of the list in number of items.
list demo2 getlength
pause

:: Return the index of the value 3 if it exists in the list.
list demo2 find 3
pause
As you can see, the list plugin is very simple to operate with, you know exactly what a call is doing even in complex loops. We should expect an output like this in our command-line:
Press any key to continue . . .
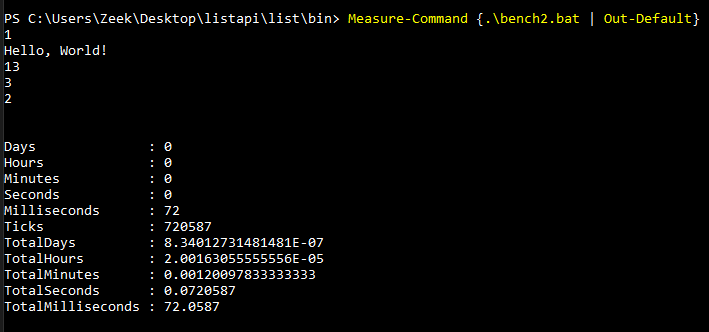
1 <-- The contents of index 0
Press any key to continue . . .
Hello, World! <-- The contents at index 1, our hello world string
13 <-- The size of our string in chars, not including the newline
Press any key to continue . . .
3 <-- The length of our list in items, we have three items (0-2)
Press any key to continue . . .
2 <-- The index found containing "3". It is at the end of the list.
Press any key to continue . . .DEMONSTRATION – ADVANCED FUNCTIONS
We close with remove, removewhere and insert. These are very powerful operations. As inferred from the name of the commands they are used to remove and insert values at locations. Let’s create our final demonstration program to show these in action. Be warned, the output may be confusing to some users, as the program is complex. Furthermore, because of this, we are going to supply an existing list instead of creating our own. Our list will contain this:
                               (mytextlist)
Hello
Hello Again
Hello Once More
Goodbye
(demonstration.bat)
@echo off
list mytextlist remove 1 <-- Remove the item at index 1, "Hello Again"
list mytextlist removewhere "Goodbye" <-- Remove where "Goodbye" is
list mytextlist insert 1 "Interruption" <-- Insert this where index 1 is
type mytextlist <-- We can use print or type the file
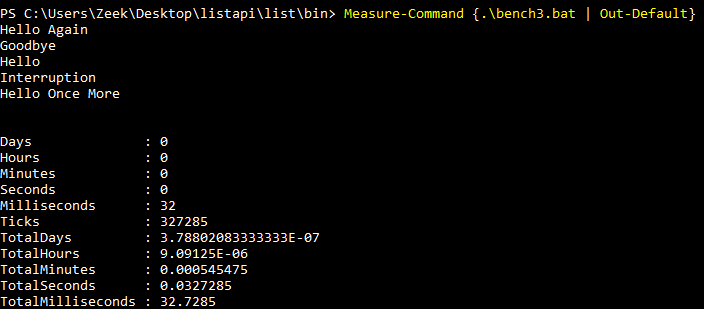
pauseThe program runs in this order: First it removes “Hello Again” at index 1. Then, it removes the index containing “Goodbye” , which is at index 2 at this point. After this point, it inserts the value “Interruption” at index 1. “Hello Once More” is currently at index 1, and this insertion will push it down to index 2, with index 1 now being occupied by “Interruption”. At the end of the operations, we should be left with:
                               (mytextlist)
Hello
Interruption
Hello Once More

(Keep in mind that the removal functions will return the value to the screen)
To some users, that may be a very complex series of events. To others, that was a simple demonstration. I recommend you read it a few times to solidify your understanding. The plugin is very powerful and some uses of it require expertise.
BENCHMARKS
For those who favor efficiency and performance, here is the benchmarks of the programs I have demonstrated above (in order). Keep in mind the time also includes batch command processing. Now, following the benchmarks, I have noted that it averages 6ms/operation which allows for ~160 operations per second. The performance of the program can increase depending on multiple factors (an existing list file, caching the executable, etc).
RANDOM NUMBER GENERATOR LIST (11 List Commands)
LIST ACCESS DEMONSTRATION (9 List Commands)
INSERT/REMOVAL DEMONSTRATION (4 LIST COMMANDS)
CONCLUSION
This plugin is very useful for programmers who need to deal with large amounts of data. I recommend using it in your applications that need performance-reliant operations. It will update the plugin in the future to include more operations and performance improvements. We hope you have enjoyed the article. Please feel free to discuss the plugin in our Discord Server and in the comments below. Thank you for your time.
I am a programmer and a computer hobbyist in the United States. I make articles about a variety of topics.


